*This post contains affiliate links. If you use these links to buy something we may earn a commission. Thanks.
Nature provides us with so many useful herbs that we use in cooking but more than that so many can support our health and wellbeing. But building an apothecary at home to support you can be a little daunting and you should always know how to handle and store the plants you want to use. There is a great book by Erin Lovell Verinder called Plants for the People that offers great advice on storing and assessing the viability of the herbs you harvest for your apothecary that I thoroughly recommend and we’ll write more on how to dry and store herbs in the future.
Today we are highlighting natures bounty with our top herbs to grow to kick start your home based apothecary.
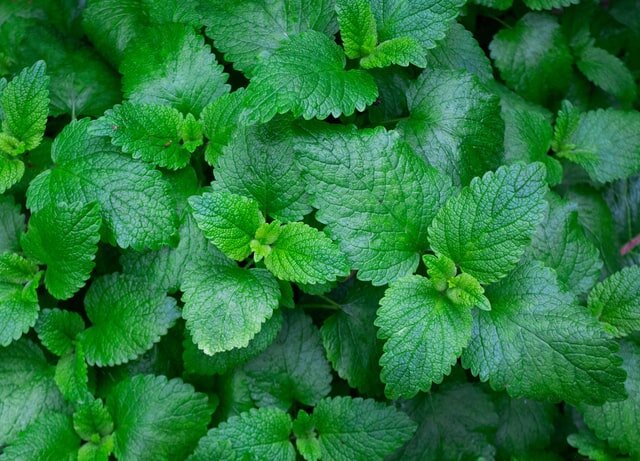
Native to Europe and Asia, this palatable herb has been used for thousands of years for everything from bloating and IBS to just a refreshing drink. My favourite herb. There are so many varieties of mint (that’s a whole post on it’s own) suitable for every palate and it’s so easy to prepare the refreshing tea, fresh or dry, it’s our go to herbal tea!
Versatile for adding flavour to cooking and has the added benefit of containing vitamins such as A, B-6, C,E and K and minerals including calcium, iron, potassium and magnesium.
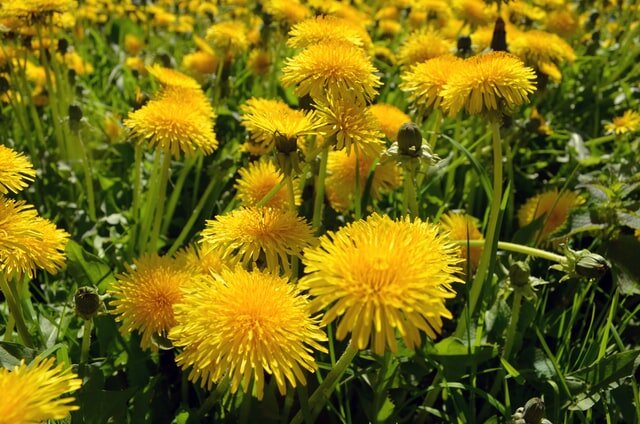
Hated by many loved by few the humble dandelion makes it onto our list for it’s versatility and flavour! From teas to salads all parts of the plant can be used and stored making it an essential for any home apothecary.
Most have heard of Dandelion tea and aside from the more old fashioned Dandelion and Burdock the root has also been used to make a coffee substitute and Dandelion honey is even a thing! Check out this brilliant recipe we found recently here
The leaves make a great salad and the flowers can be added to omelettes, baked into cakes or even just as decoration.
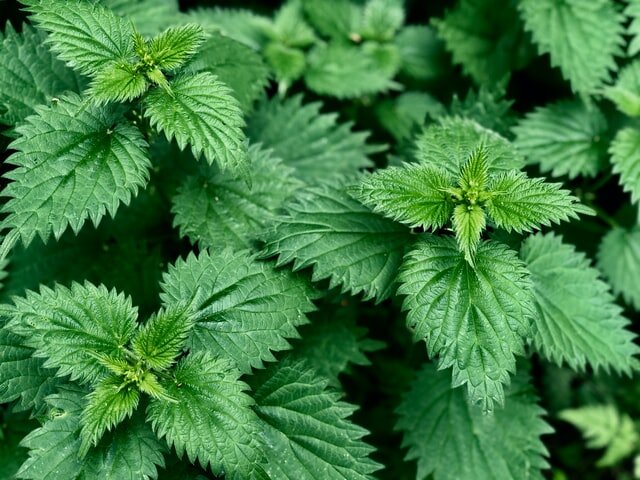
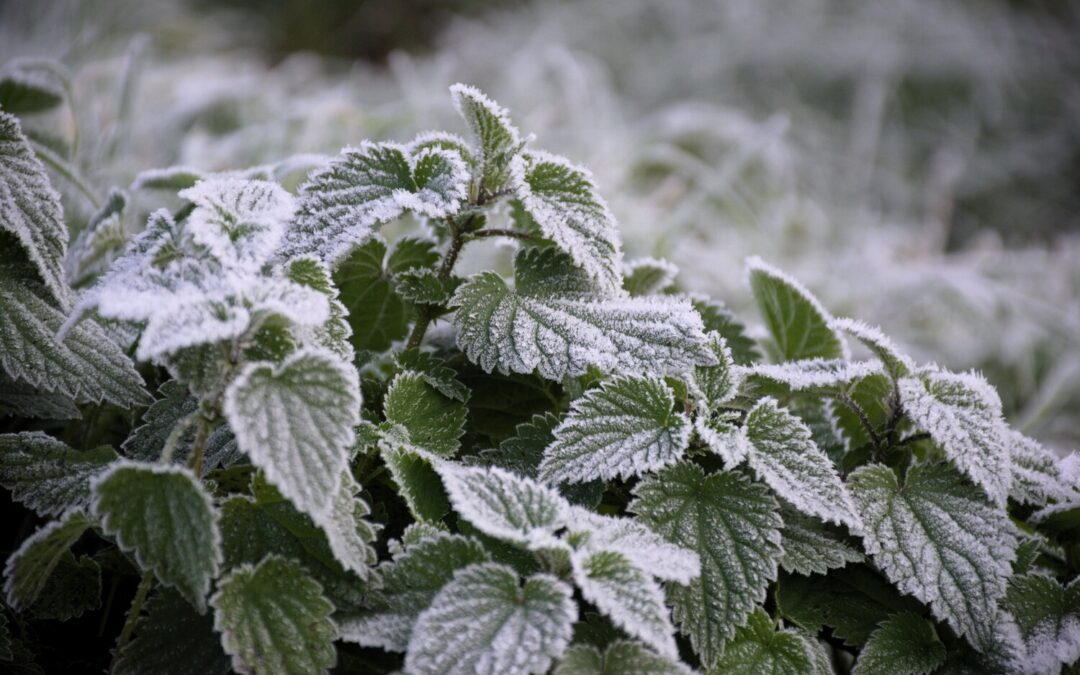
The nettle was the villain of mine and many others as a child and a day running around in the fields around where I grew up rarely ended without the tell tale signs of a run in with some nettles!
Abundant and good to harvest between spring and autumn the shoots and leaves have been used as a tonic with traditional nettle porridge being seen as a kick starter to spring after a long winter in parts of Britain.
Nutritionally, this plant really packs a punch and is full of Vitamins A,C and some B as well as potassium, calcium, magnesium and iron! It can be made into and added to such a wide range of recipes from pesto to beer and tea to soup!
Just be careful how you pick it! Known in roman times as a “warming herb” because of it’s sting which can cause itching and swelling, handle this herb with care to reap the nutritional rewards.
Elderberries
Another well known herb for it’s said to have abilities to ease cold and flu symptoms as well as help you recover faster. Elderberry syrup is a popular home remedy that is super easy to make, this is our favourite.
However, know what you are picking, the raw berries, bark and leaves of the plant are known to be poisonous so careful preparation is iso important! If you don’t feel confident making the preparation yourself…don’t! You can pick up Elderberry Syrup from many health food stores.
Slippery Elm
Not native to the UK, this tree hails from parts of the US and Canada, it doesn’t usually thrive here in the UK. A soothing herb that is claimed to help with symptoms of IBS, Sore throats and UTI’s (however, more scientific research is still needed)
Makes a great tea in it’s powdered form or even a poultice it was said to be used to heal gunshot wounds during the American revolution!
Thought to soothe wounds, rashes and inflammation the edible petals of the plant can be used for their antiseptic properties. Dried flowers can be used in the bath, infusions added to ointments or made into salves.
It’s so easy to grow and many gardeners grow this plant for its vibrant foliage. Confusingly it is also known as a pot marigold but shouldn’t be confused with the French marigolds you use on the plots or flowerbeds.
The flowers can be added to anything from Eggs to Ice cubes or used topically as an oil infusion on scrapes and stings!
The most frustrating herb we grow but one we wouldn’t be without. So easy to use to reap the benefits you only need to steep as a tea and bam you have a calming restorative tea to help you relax after a long day.
Such a beautiful flower adding a splash of colour to the borders but also used by many to shorten the length of the common cold and reduce symptoms of the flu! It is also been said to be a bit of an immune system booster! The whole plant can be used with the root being the strongest and great for using in tinctures. But if you don’t want to dig up the whole plant use the flowers and leaves in a tea mixture
So that’s it. A round up of our basic (but essential) herbs in our cabinet. What others would you add? Do you have any recipes you use with your home apothecary?
Caution: When using herbs for medicinal purposes you should seek the advice of a medical professional before starting any holistic treatment. We make no claims about a herbs efficiency and ability to cure and you should do your own research before using herbs in this way. Always exercise caution when foraging herbs that you have not grown and make sure you know what you are picking.
I don’t consider myself a fair weather plotter (well maybe a little!) but there won’t be many days that I will be venturing out onto the plot in January. In reality the ground on our plot will be mostly waterlogged or frozen so even a bit of therapeutic digging is pretty much out of the question this month.
But there are some things you can do and this month and most of my prep will revolve around indoor activity. Here’s our list of things to be getting on with while we dream of springtime!
We’ve so far not had much of a successful over winter harvest so our ‘hungry gap’ tends to start a lot early than most, but I’m hoping for that to change one day as we start to make our homesteading journey a reality!
If you’ve been more organised than us then you can get on out there and harvest your Winter Cabbages, Cauliflowers, Leeks, Celeriac, Parsnips, Swedes and Winter Radishes!
It’s a great time to get spreading some well-rotted manure or compost over any empty beds; no need to dig it in, spreading now will give ample time for the worms and bugs to do their thing and mix it for you!
Last year we spread a tonne of Mushroom compost over our empty beds which had such an amazing impact on our harvest in the summer, the best bit about it was it’s a byproduct of mushroom growing and so rather than it going to waste, it’s done a fantastic job on our plots. The mulchy straw content in it has proved to be such a good weed suppressant as well!
Get covering those seed beds if you have them, it’s time to start warming them up ready for February and March sowing. Try to avoid plastic if you can as it’s single use and the black stuff can disintegrate; when we took over our plot it was full of black plastic string from the old plastic weed stop. Old carpet will do the trick or use up some of those cardboard boxes you’ve been saving for a rainy day!
Check any fruit cages or structures in the plot or garden to make sure there’s no damage after the wet or snowy autumn and fix them before the growing season starts because when it does you won’t have time to fix them up then! And while your at it if you are lucky enough to have Fruit trees it’s time to give those Apples and Pears a good winter prune and check for damage and disease.
Growing
There is little sowing to do in January, especially on our plans, it doesn’t really start to kick in fully until Feb, but if you are itching to get your hands dirty here’s a list of plants you can get in now!
Broad Beans
Not a favourite in our house (they remind me of cheesy feet when they are cooking) but broad beans are a great early crop to get in. If you didn’t get a chance to get them in the ground at the end of the year (or more likely, they’ve been dug up by a creature) then it’s not too late to get some more in now as long as your beds aren’t frozen. Otherwise you can sow them in pots and keep them covered (can be outside) until the ground thaws in spring.
Fruit Trees & Bushes
Just as you prune the more established trees it’s a good time to get any new trees or bushes in the ground by planting bare root varieties while they are dormant. Be warned though if it’s really cold or frozen perhaps do this next month!
Garlic
If, in the South East you should be able to sow your garlic this month but only if the ground isn’t waterlogged or frozen. To be on the safe side I usually wait until February or March for this one but you can also get it in the ground late October for an earlier crop.
Onions
So that I can get the longest growing season for my Onions I plant from seed now into module trays and keep them inside on a warm windowsill to germinate, ready to move outside in March or April when I think we’ve seen the last of the frosts. Also this year I’m going to give Multi-Sown onions a try for the first time to see what the yields are like. This is simply sowing 4 or 5 seeds in a module together and planting out as a clump instead of separating; we do ALOT of pickling so smaller bulbs wouldn’t be an issue as long as I plant singles as well.
Leeks
I have never successfully grown leeks!! I’m rubbish at mounding them up and the one year we did get a pretty good looking harvest they were destroyed by Allium Leaf Miner Beetles *sigh. So I’m taking a break from Leeks for the next couple of years to get over the frustration….and hopefully the beetles! But, like onions to get the longest growing season possible, get them sown indoors.
Peas
For a super early crop of peas sow indoors now in trays and harden off towards the end of March or early April before planting outdoors. Just try to resist eating the shoots before you get them outside!
Radishes
A great beginner veg and grow super quickly. You can even eat them as Micro greens and begrudgingly, as I’m not much of a fan of Radish, I must say they are super tasty! To give yourself an early crop, grow now in trays indoors or outside undercover (as long as it doesn’t get below 5 degrees).
Rhubarb
Ah, the mighty Rhubarb, a firm favourite in our house and a show stopper in the Kitchen Garden. Plant new or divide your crowns any time now; Rhubarb doesn’t mind the cold but needs a good bit of drainage so make sure your soil isn’t waterlogged when you plant it.
Potatoes
Another job in January is to start chitting those Early potatoes! pop them in an old egg carton on a light windowsill and let them be, after a week or so you’ll start to see those lovely sprouts!
Planning
I always use January to work out my rotation on the beds for the year and using my rather obsessive selection of seeds to decide what I’m going to grow this year! I’ve tried to stick to a strong rotation but this year I’m going for something different! I’m going more down the companion planting route which is hurting my brain somewhat to plan out! But having a drawing or at least a planting/sowing calendar is a really useful way to figure out what’s going in the beds, pots and windowsills throughout the growing season. Love the Garden have a great post on what to plant throughout the year that’s really useful and Garden Focussed have an amazing tool that will do the plan for you!!
Alliums don’t just steal the show in your garden. Their flowers also benefit insects. Bees and butterflies simply love their many individual flowers brimming with nectar. Allium: What’s in a Name? ‘Allium’ is the botanical name assigned to ornamental onions; and very...
I had the enormous pleasure recently of being a Hanger On to a Royal Garden Party at Buckingham Palace. Whilst I loved the truly magical experience, the incredible food as well as the pomp and ceremony of the day, what I was most excited about was the opportunity to...
*This post contains affiliate links. If you use these links to buy something we may earn a commission. Thanks.
The British winter can be tough on your garden. It is cold, unpredictable, and wet, complete with frost and potential snow, all of which can have a drastic effect on the health of your beloved plants. As the colder months draw in, it’s time to prepare your garden or allotment as best as you can to help it weather the hard times ahead. Part of your gardening preparations should always focus on your soil, as this can be the locus of many winter issues. By ensuring your soil is in top condition heading into winter, you’ll be giving your garden a solid foundation to survive upon.
Tidy Up But Don’t Blow it Up!
To begin with, it’s time to tidy up. Giving your garden the opposite of a spring clean will help it through the times when it’s too cold or rainy for you to want to venture outside for basic maintenance. If you’ve got a lawn that needs to be clear be sure gather up all the fallen leaves before they can turn to a slimy mulch on your lawn, and pop them in the compost. Or even better start your own leaf mould heap the bugs will love you. But put down the leaf blower! Leaf blowers can harm the little critters that shelter in the fallen leaves. Use a leaf rake that’s suitable to use around delicate plants and that way it shouldn’t be as damaging to the wildlife either!
Clear as much debris as you can to keep your garden spick and span, and easy to care for over the winter. Remove any rotting wood from the garden and tidy up the wooden edges of any plots as slugs will love the nice damp conditions ready to launch attacks on your delicate veg next spring! Tidying up dead material also lessens the chance for diseases to develop, or for pests to feed on mulch and enter the spring full of strength to feast on your seedlings.
Bonfires and ash
Who says preparing your soil for the winter can’t be fun? Bonfires are a great side effect of clearing all that debris, and you can treat yourself to a toasty winter gathering (marshmallows optional) as you burn away all the detritus. Make sure you check the rules in your neighbourhood or allotment before starting a bonfire and keep it small! We use a small 60 Litre garden incinerator bin to burn any blight damaged plants or dead wood. Nothing goes to waste, and once your fire is burnt down, you can scatter the ashes over your ground as a supplement, or add a small amount to the compost heap. You want to be careful you don’t add too much, but a little can go a long way.
Protect From Water-Logging
Water logging your soil over winter can be a huge problem. Prepare to avoid this by ensuring you have plenty of potential for irrigation, and no areas where water can gather in large quantities. Raised beds are a great way to keep soil fresh, and you can aerate your lawn by pushing into it with a garden fork at intervals, stopping the grass and soil from clogging with rainwater. Keeping everything permeable, especially fixed features like paving stones, is the key to protecting your soil from damage.
Plant Bulbs
Now is the time to plant your bulbs for the spring, from tulips to daffodils and everything in between. And get your Garlic bulbs ready to go in toward the end of Autumn as they like a little chill!
Doing this will allow them to winter underground, where it can be several degrees warmer than on the surface, and it will keep your soil active and held together. You also don’t want to be doing this too late into the winter, when the soil may have compacted through the cold, and you will be disturbing it too much and leaving it open to threats.
Start Thinking About Soil Prep
You can never start planning too early for next year. After a year of growing your soil may be more depleted of nutrients than you realise! Testing your soil could give you a head start on growing a bountiful harvest next year. We were recently joined by Robert Galster from Soil Safe UK who told us all about the importance of testing your soil! Read it here.
Leave It Alone
Leading on from this, the final way to prepare your soil for winter is simply to leave it alone! Overdigging can remove the natural protective layer built up across the surface of your soil, leaving your garden or allotment more susceptible to damage over the winter.
Basil is a staple ingredient in our house as we make a lot of Pesto based dishes, especially during the Courgette glut in July. We’ve found a great Courgette Pesto recipe here! We propagate Basil in pots all year round and always have one pot in use while another is growing and whilst this fabulous fragrant herb is easy to grow it can also be super eager to bolt. However, the bonus to that is a ready supply of seeds! (Although a slightly more bitter leaf!)
You don’t just have to grow Basil in pots as you’ll see here and it’s also thought to make a great companion plant for tomatoes (and even better companions for eating!) to keep away the whitefly!
Where to Grow
You can grow on the window sill, tunnel, green house or even outside; this easy to grow herb is a great one to keep on the windowsill all year round to keep fresh herbs during the winter. If you are growing outside the trick is to beat the frost because if you catch a frost it’ll kill them! Basil doesn’t do well in temperatures below about 5c and it takes eight weeks to mature so you’re looking at the end of May at the latest to get these sown outside as you might find (dependent on your area) that temperatures might dip to low at night.
The alternative is to grow in pots, that’s what we do! That way we can protect the plants a bit more by sheltering them a bit more as the nights get cooler and eventually we move them inside.
Growing and Care
The best way to ensure you have a steady supply of basil is to sow in two weekly succession throughout the spring for outside plants and all year round if you are growing indoors.
You can grow in plug trays individual or if you like A LOT of Basil you can simple sprinkle the seeds over a tray of prepared compost. When the seedlings have their first pair of true leaves (you’ll know when you have them as they look less like weeds and more like a baby Basil plant!) they’ll be ready to handle and pot on.
Once the baby plants have got to around 5cm, for those going into a green house or windowsil, or larger for outdoor planting you can move the plants to their final position. We usually mix in Mushroom compost (because seriously, that stuff is AMAZING and gives every crop we’ve used it on a yield boost!) as Basil like a good rich soil to thrive in.
The Basil you grow in the ground is going to look very different from the pots you get from the supermarket, which is often forced in some way, as they can get quite bushy! So they need a surprising amount of space between each plant. Go for spacing around 30cm apart in each direction.
A note on watering. Whilst these tenderer plants need a fair bit of watering, especially in hot weather as they tend to wilt very quickly, Basil hates being stuck in soggy soil so to test how wet the soil is dig down a couple of inches and if the soil looks reasonably damp leave it alone for another day unless there’s obvious signs of wilt!
Harvesting
The best bit (obviously) is the picking!!
There’s just a few hints and tips for getting the best yield from your hard work! When you harvest your Basil from pots take individual leaves (go for the big ones!) rather than cutting stems as you’ll encourage even more growth. You could also pinch out the growing tips so the plant focuses on growing out rather than up and bolting! Even though we harvest daily we still have far more than we can use so we always have a supply.
If you are growing outdoors before the first frosts arrives and the temperatures dip too low (you don’t want a bitter, or worse dead harvest) so pull all your plants and strip the leaves to dry, freeze or even make into pesto! (more on that coming soon)
*This post contains affiliate links. If you make a purchase using one of these links we will receive a small commission
This is my all time favourite “herb”, although technically not a herb I’ve put it in our Herb section because it’s used so often in herby preparations! It feels right! I always have a compulsion to cut Lavender and hang it but I confess it mostly stays hung forever and never used! Hopefully, with this years batch I’ll actually put it to good use!
First introduced to the UK by the Romans it’s said to get it’s name from the latin ‘lavare’ which means to cleanse and it was (as it is now) a popular addition to their baths. It’s also still highly regarded for it’s soothing effects. Even thought to promote sleepiness at bedtime it has also been used to soothe aches and skin conditions.
Uses and theories aside this beautiful plant adds a splash of purples and pinks to your garden and we particularly love it on the plot to keep the cats at bay….not entirely sure it’s the lavender or cat scarer that can take the credit for this but we’re not chancing removing either of them!
It also does an amazing job attracting pollinators to the plot, so if you are using it on the allotment put it near plants that need insect pollinators for a bumper crop!
It’s a great plant for beginners, it’s so low maintenance and doesn’t mind a bit of neglect, aside from a good strong prune, it’ll give you fabulous flowers every year.
Here’s our guide to healthy fragrant, gorgeous lavender in your space:
Where to Grow
Whilst it can be low maintenance, Lavender loves full sun with well draining alkaline soil. Making it also perfect for pots on the patio! They will struggle if they get bogged down in wet soil so don’t worry about watering every day unless you’re dealing with a really hot dry spell.
Not all lavenders are created equal and some are more hardy than others. If you are worried about keeping it alive go for ‘Hidcote’ which will give you beautiful deep purples that will come back every year.
Others are half hardy or tender such as French lavender (Lavandulastoechas) and they are much easier to grow in pots that you can move to more sheltered spots in winter to protect it from frost.
How to Plant
Plant your new lavenders from March to May especially if they are tender. To make sure you give it the best start add some grit for drainage and a bit of bone meal (or vegan alternative) to give it a boost!
Don’t go for general purpose compost if you don’t have to as it can be a bit claggy, John innes no 2 or 3 would work better if you are planting in pots and try and choose terracotta pots for better drainage (and there’s something lovely about old pots we love these!).
Growing and Care
Lavender grows robustly for several years but as the years pass you’ll notice fewer flowers and more woody growth as the plant matures. To keep your lavender in good shape give it a good cut back in spring….but be warned don’t go right down to the woody growth. If you cut down into the woody area it won’t regenerate and that could be the beginning of the end for that plant especially if you’ve cut to much of it down to the wood!
Also it does like a trim after it has finished flowering, but this bit isn’t so bad as you’ll be cutting flowers usually anyway if you are growing to harvest as you just cut it back to the leaves.
That should help keep the shape longer!
Got a particularly loved bush that you want to reproduce…go for cuttings. Take these from non flowering stems or softwood in May. If you do take cuttings make sure you overwinter undercover once they have rooted before planting out in the spring!
*This post contains affiliate links. If you make a purchase using one of these links we will receive a small commission
1")


")